Setting up your development environment
We will develop our Parallel Programming projects on the VSC Cluster Leibniz, which is hosted by UAntwerpen. To access Leibniz you need either
a VSC account (
vscXXYYY) , ora guest account (
guestYYY).
If you do not have an account yet, generate a SSH key pair (Generate a SSH key pair)
To view and edit your project directories and files, or execute the scripts and programs you write, we use Visual Studio Code (VSCode), which is a graphical IDE (integrated developmnent environment). This allows for a smoother experience than the standard terminal based access on the cluster. VSCode is available on Windows, Linux, and macOS.
You might find the documentation for using the VSC clusters useful.
Setting up your local environment
Install a SSH client
To make a connection with a remote machine (c.q. Leibniz), you need a supported SSH client. This comes pre-installed on macOS. For Windows and Linux, check this.
Generate a SSH key pair
Use this command to generate a SSH key pair:
> ssh-keygen -t rsa -b 4096
Generating public/private rsa key pair.
Enter file in which to save the key (/home/user/.ssh/id_rsa):
Enter passphrase (empty for no passphrase):
Enter same passphrase again:
Your identification has been saved in /home/user/.ssh/id_rsa.
Your public key has been saved in /home/user/.ssh/id_rsa.pub.
The location of your home directory may look different depending on your operating system.
(On Windows it is usally C:\Users\<your-user-name>). It is best to accept the default location.
Note
In any case, do not use a path containing spaces.
The public key /home/user/.ssh/id_rsa.pub is in fact a lock which will be placed in your home
file system on Leibniz. This lock can only be opened with the correct private key, which you keep
on the laptop or desktop you use to access Leibniz. Never expose your private key to anyone. If,
however, this should accidentally happen, contact your sysadmin or go to the
VSC account page and withdraw the compromised key. Then,
generate a new key pair and upload the new public key. The private key can be furter protected with
a passphrase (a lock on the lock).
Install and setup Visual Studio Code for remote development with Python, C++ and Fortran
Install VSCode (Visual Studio Code) from https://code.visualstudio.com/download for your operating system. Then, open VSCode. On the left you see a vertical toolbar with some buttons:

Each of the buttons opens a correspondig window pane for a specific task.
The
Explorerpane provides a directory view of the current workspace, which may be local or remote (we will only work with remote workspaces on Leibniz).The
Searchpane is for searching in that workspace.The
Source Controlpane lets you manipulate the git repository in your project.The
Run and Debugpane is for running and debugging programs and scripts. (This we will not use because its functionally for working remotely is a bit limited and we will need to work around that).The
Extensionlets you install and manage VSCode extensions.Finally, the
Remote Explorerbutton is at this point usually not available yet, as that VSCode comes with theRemote-SSHextension, which we still have to install. The corresponding pane manages all the different remote workspaces on the remote locations you have been working on. Here, you select the remote workspace, and in theExplorerpane you view and manipulate its directory tree.
Press the Extensions button to access the Extensions pane, search for the items below,
and install them. In the figure below we searched for all extensions with a name containing
s’Remote’.
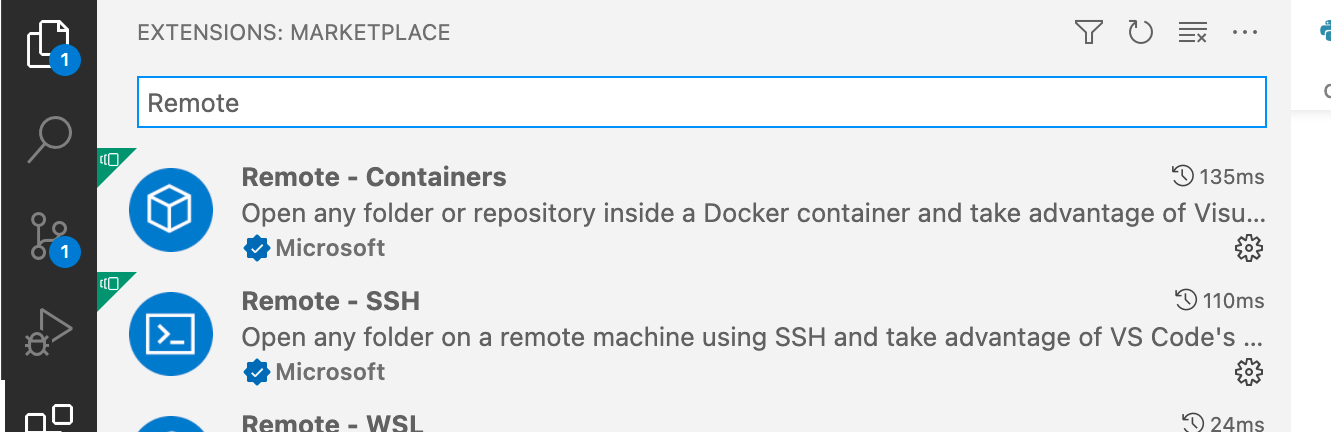
The Extensions pane.
We need these VSCode extensions (plugins):
Remote - SSH
Remote Development
Preview
Python
MagicPython
Python for VSCode
Pylance
CMake
CMake Tools
C/C++
C/C++ Extension Pack
C/C++ Themes
Better C++ Syntax
Modern Fortran
Obviously, you are free to explore other VSCode extensions - that’s what learning is about!
Connecting to Leibniz in VSCode
Next, we must create an SSH Target to establish a connection to Leibniz. In the toolbar on the left,
press the Remote Explorer button (see The VSCode toolbar),
and make sure the dropdown menu next to Remote Explorer shows SSH Targets:

The Remote Explorer pane.
Press the + to create a new SSH Target. You will be prompted to fill in
Setting up an SSH Target
The ssh command to connect with:
> ssh <userid>@login1-leibniz.hpc.uantwerpen.be -i </path/to/your/private-key>
Where <userid> is the userid of your VSC account, or guest account, login1-leibniz.hpc.uantwerpen.be
is the name of login-node 1 on Leibniz and </path/to/your/private-key> is the full path to the private
key that you created for your account. (Note that on windows you must use backslashes as the path separator).
Next, it with will prompt you for the location of the ssh config file. The default location is generally ok. A new entry with the name login1-leibniz.hpc.uantwerpen.be will appear in the SSH Targets list.
When VSCode asks what to choose for the host (Linux/Windows/MacOS/) choose “Linux”.

Connecting to an SSH Target
To establish a connection you right-click on the SSH Target in the Remote Explorer pane ane choose
Connect to host in current window or Connect to host in new window and enter a remote location
(directory) where you want to work. A good place is your data or scratch file system:
/data/antwerpen/<xyz>/<userid>
/scratch/antwerpen/<xyz>/<userid>
(<xyz> are the first three digits of your userid, e.g. 123 if your userid were vsc12345).
For a guest account this would be:
/data/antwerpen/gst/<guestid>
/scratch/antwerpen/gst/<guestid>
Note
On all VSC clusters you have access to three file systems with different properties. You might want to check out the data storage VSC documentation for details.
The central pane will then show you a ‘Get started’ window. Press the Open ... button and select the
directory where you would want to start your work. Typically, this would be a workspace directory where
a some of your projects live, or a project directory.
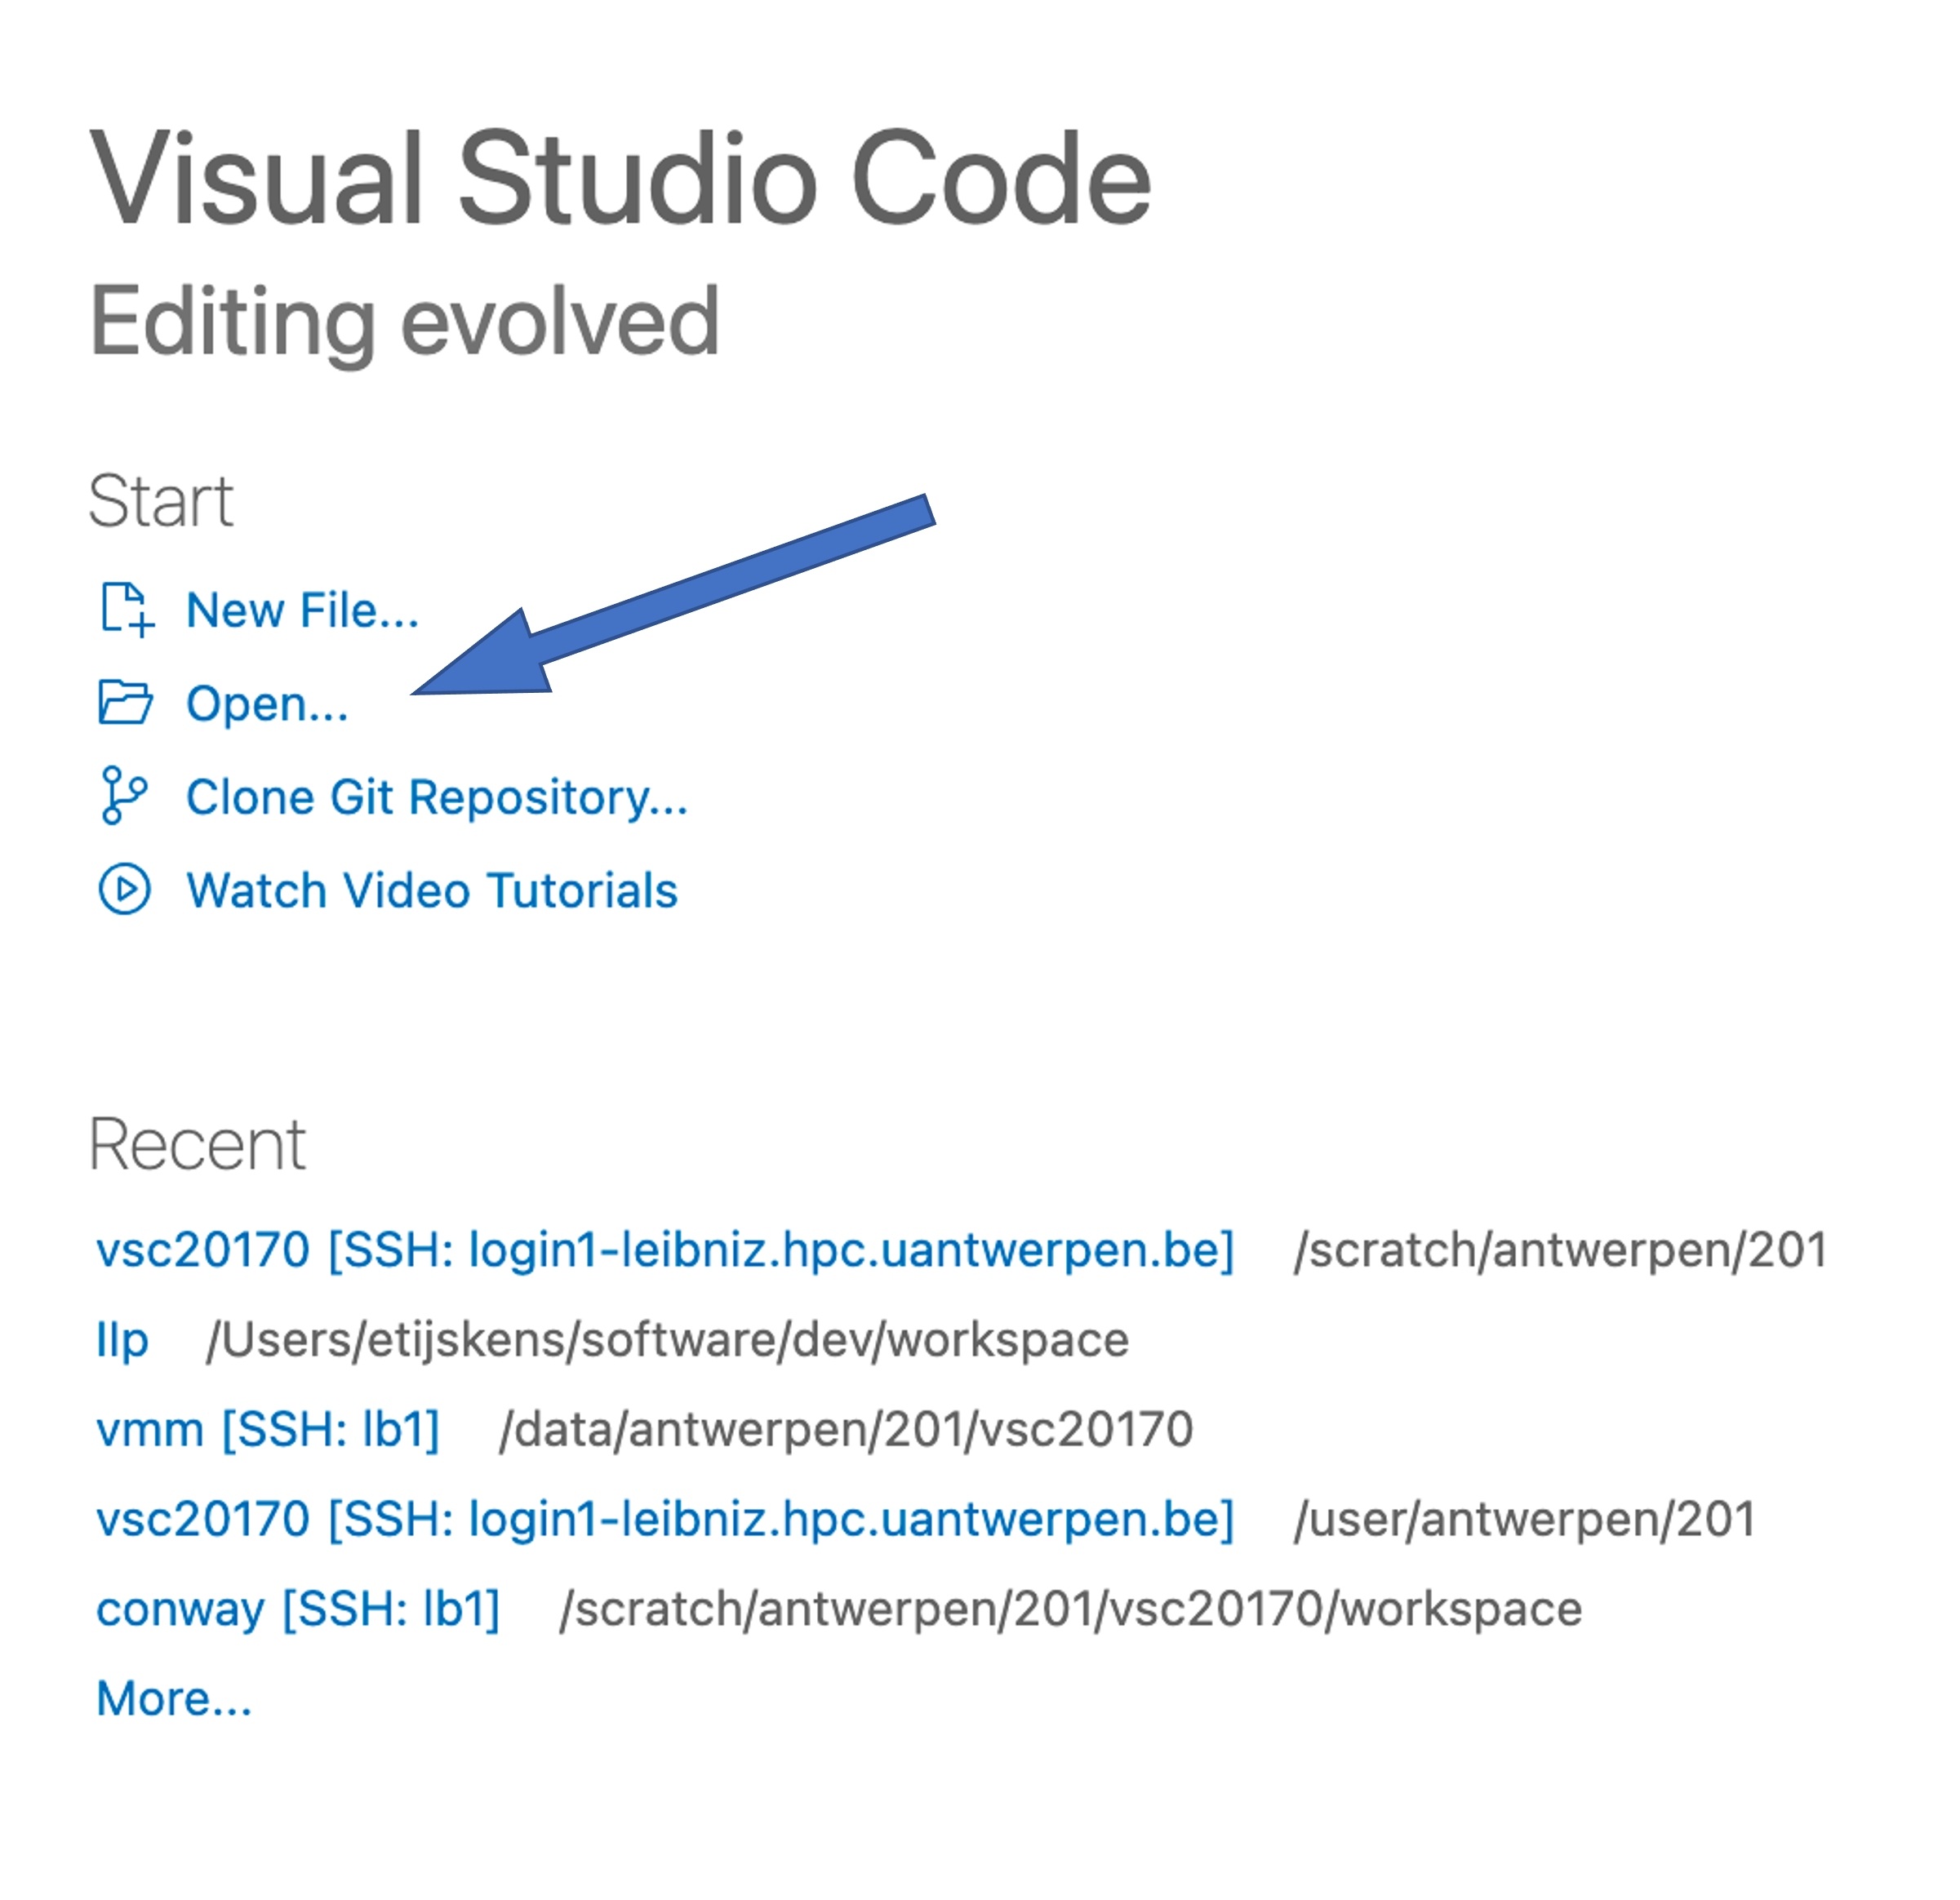
The Get started window.
Finally, press the Explorer button in The VSCode toolbar to see the tree view of the your
remote working directory. Here, you can add, delete, rename files, etc. If you double click on a
file, the file is opened in the editor pane. The VSCode editor is a modern graphical editor with
lots of practical features: it is aware of the language you are programming in (you probably need
to install some extension) and can do syntax coloring, automatic indentation, on the fly syntax
checking, code completion, and so on.
SSH Target Troubleshooting
Ssh debugging
If you fail to connect to Leibniz, try to open a terminal (command prompt or powershell in Windows). Add the
-v, -vv, or -vvv to the ssh command to debug the ssh connection:
ssh -v[v[v]] <userid>@login1-leibniz.hpc.uantwerpen.be -i </path/to/your/private-key>
This produces a lot more output that may help you to pinpoint the origin of the failure.
Unprotected private key file error
A typical problem under Windows is the UNPROTECTED PRIVATE KEY FILE! warning. To fix this, check out
Windows SSH: Permissions for ‘private-key’ are too open.
Invalid format error
Another typical problem under Windows is the Invalid format error, which arises when
the user generated a SSH key pair using PuTTY, and forgot to convert the key to OpenSSH format.
Check out Converting PuTTY keys to OpenSSH format
to remedy this.
Solving Disk quota exceeded due to .vscode-server getting too big
When you start working remotely, vscode creates a hidden directory .vscode-server in
your $VSC_HOME directory. This directory may sometimes grow large, which in due of the
limited disk quota on $VSC_HOME (3 GB) may cause trouble. When you connect to a login node
on one of the VSC clusters, you always get a welcome message and a summary of your disk usage.
If you get a !!! warning: quota exceeded message, check the size of the .vscode-server
directory with this command:
> du -sh ~/.vscode-server
1.3G        /user/antwerpen/201/vsc20170/.vscode-server/
If the size is significant when compared to the size quota on $VSC_HOME, which usually
amounts to 3 GB, you might want to move the .vscode-server to another file system, e.g.
$VSC_DATA or $VSC_SCRATCH, and create a symbolic link for it in your home directory:
> mv ~/.vscode-server $VSC_DATA
> ln -s $VSC_DATA/.vscode-server ~/.vscode-server
You can check whether this succeeded by running:
> ls -al .vscode-server
lrwxrwxrwx 1 vsc20170 vsc20170 44 Nov  9 16:26 .vscode-server -> /data/antwerpen/201/vsc20170/.vscode-server/
This shows the existence of a symbolic link file .vscode-server in your home directory,
whichs redirects, as indicated by the -> arrow, to the actual file at
/data/antwerpen/201/vsc20170/.vscode-server/.
If, however the reported size is small relative to the quota for your $VSC_HOME (3 GB)
then some other directory/file is causing the issue. Note that $VSC_HOME is not meant to
store your workspaces, data, … (see
Where can I store what kind of data).
Setting up your remote environment
Clone the IIp repository
Once you are able to connect, you can setup your environment on Leibniz.
IIp is a GitHub repository that contains the documentation you are reading
right now, as well as some useful bash scripts to help you to set up your environment
correctly and automate some tasks.
Open VSCode, and select View/Terminal from the menu bar. A window pane with a terminal will open, with the chosen location as the current working directory. It is a Linux terminal, because the login-nodes of all VSC clusters run the Linux operation system (CentOS). If you are not familiar with Linux, check out the VSC documentation Basic Linux usage.
In the terminal, enter the following command:
> module load git
This command makes the git command available. Contrary to PCs, HPC systems do not make all installed software directly available. There are too many packages, and different versions might have conflicting requirements. The user must specify which software packages he wants to use by loading modules. The command:
>  module list

Currently Loaded Modules:
  1) leibniz/supported   2) git/2.35.1
lists all loaded modules. Module 1) leibniz/supported is a general module that enables access to all
modules installed for Leibniz. Module 2) git/2.35.1 is the git module we just loaded. Generally, the
default version of a module is the most recently installed one, which in this case happens to be 2.35.1:
> git --version
git version 2.35.1
Next, we cd into the scratch file system and use git to download (clone in git language) the
IIp GitHub repository that was prepared for this course:
> cd $VSC_SCRATCH
> git clone https://github.com/etijskens/IIp
Cloning into 'IIp'...
remote: Enumerating objects: 67, done.
remote: Counting objects: 100% (67/67), done.
remote: Compressing objects: 100% (48/48), done.
remote: Total 67 (delta 10), reused 65 (delta 8), pack-reused 0
Unpacking objects: 100% (67/67), done.
(The output may vary as the IIp project is still evolving). The IIp repository contains the documentation
you are reading here, as well as the some useful scripts to setup your environment.
Then, source its iip-installs.sh script to install some Python
packages that we will need for our work and which are not pre-installed on the cluster:
> source ./IIp/bin/iip-installs.sh
...
The following Python packages are installed:
Micc2: a package to manage our project. Setup of a versatile project structure, with hooks for documentation and testing, version management, setup of local and remote git repos, building Python modules from C++ or Fortran code.
Numba: accelerating Python functions.
The install location for Python packages is set to $VSC_SCRATCH/.local, instead of the default
$VSC_HOME/.local to avoid that the disk quota of $VSC_HOME are exceeded.
Note
This iip-install.sh script installs Micc2 and Numba in the current Python environment only,
which``iip-install.sh`` sets by sourcing the iip-env.sh script. Both scripts however accept an
optional name of module with the Python distribution you wantm to work with:
> source ./bin/iip-install.sh IntelPython3 # calls 'source ./bin/iip-install.sh IntelPython3`
As the IIp projects is still evolving, you might want to update it from time to time:
> cd $VSC_SCRATCH/IIp
> git pull
remote: Enumerating objects: 49, done.
remote: Counting objects: 100% (49/49), done.
remote: Compressing objects: 100% (16/16), done.
remote: Total 39 (delta 27), reused 32 (delta 20), pack-reused 0
Unpacking objects: 100% (39/39), done.
From https://github.com/etijskens/IIp
   b34e552..a5c19e3  main       -> origin/main
Updating b34e552..a5c19e3
Fast-forward
 SETUP.rst             |  0
 docs/authors.rst      |  2 +-
 docs/changelog.rst    |  5 -----
 docs/conf.py          | 24 ++++++++++++------------
 docs/index.rst        |  1 +
 docs/installation.rst |  9 ---------
 docs/setup.rst        | 96 +++++++++++++++++++++++++++++++++++++++++++++++++++++++++++++++++++++++++++++++++---------------
 docs/usage.rst        | 23 +++++++++++++++++------
 iip/__init__.py       |  2 +-
 pyproject.toml        |  2 +-
 10 files changed, 114 insertions(+), 50 deletions(-)
 delete mode 100644 SETUP.rst
 delete mode 100644 docs/changelog.rst
 delete mode 100644 docs/installation.rst
This pulls the latest changes in the remote GitHub IIp repository into the your IIp repository
on Leibniz. If you already have the latest version, git pull will tell you so:
> git pull
Already up-to-date.
Preparing for Version Control
A Version Control System (VCS) is extremely useful for software development. Among others, it provides you with a backup of every commited version of your work. This backup can be both local and remote. So, even if you loose your machine, you wont loose your work. At any time, you may switch back to earlier versions and continue from there.
We will use git for version control, and put our remote repositories on GitHub. That is all free, but you need to create a GitHub account.
Creating a GitHub account
Go to GitHub, enter your e-mail address and click “Sign up for GitHub”:

You will then be prompted to choose your username and a password. Then, click ‘’Verify” and solve the puzzle. A button “Create account” will appear, press it. You will receive an e-mail at the e-mail address you provided with instructions to activate your account. Here’s a screenshot:

You also need a “github personal access token” for micc2 to be able to automatically create remote repositories for new projects. Follow this guide:
At point 7 check at least the boxes
repo, andread:org.
After point 9 (copying the token), go to the VSCode terminal you opened before, and execute the following command:
> echo <paste> > ~/<your-github-username>.txt
where
<paste>is the keyboard shortcut for pasting on your operating system. (On Windows this isctrl+v, on Linuxshift+ctrl+v, and on macOScmd+v).<your-github-username>is the username that you chose above when creating your GitHub account.Skip point 10.
Setting up micc2
Now that you have a GitHub account and a personal access token, we are ready to set up micc2, to provide it with the necessary information to access your GitHub account, and create remote repositories automatically, when you start a new project with micc2.
Run the following command in the VSCode terminal and provide the information asked for. You may
abort the procedure by entering ^^:
> micc2 setup

Enter your full name
Enter `^^` to exit.
>: John Doe

Enter your e-mail address
Enter `^^` to exit.
>: john.doe@example.com

Enter your github username (leave empty if you do not have one,
  or create one first at https://github.com/join). Default = []
Enter `^^` to exit.
>: the-john-doe

Enter Html theme for sphinx documentation. Default = [sphinx_rtd_theme]
Enter `^^` to exit.
>:
These preferences are saved to /user/antwerpen/201/vsc20170/.micc2/micc3.cfg:
{
  "full_name": "John Doe",
  "email": "john.doe@example.com",
  "github_username": "the-john-doe",
  "sphinx_html_theme": "sphinx_rtd_theme",
  "version": "0.0.0",
  "github_repo": "{{cookiecutter.project_name}}",
  "git_default_branch": "master",
  "minimal_python_version": "3.7",
  "py": "py"
}
Continue? yes/no >:
Preferences saved to /user/antwerpen/<XYZ>/<vsc-userid>/.micc2/micc3.cfg.
Configuring git:
  git config --global user.name the-john-doe
  git config --global user.email john.doe@example.com
Paste your GitHub personal access token, or the file location containing it:
:> ~/the-john-doe.pat
If you get an error bash: micc2: command not found, you probably forgot to:
> source $VSC_SCRATCH/iip/bin/iip-env.sh